Nessun dorma – »Turandot» (Puccini) traducion

Traducion italiano a espanol

Nessun dorma!
Nessun dorma!
Tu pure, o principessa,
nella tua fredda stanza
guardi le stelle che tremano
d’amore e di speranza!
Ma il mio mistero
è chiuso in me,
il nome mio nessun saprà!
No, no, sulla tua bocca lo dirò,
quando la luce splenderà!
Ed il mio bacio scioglierà
il silenzio che ti fa mia!

Il nome suo nessun saprà…
E noi dovrem, ahimè, morir! Morir!

Dilegua, oh notte!
Tramontane, stelle!
Tramontane, stelle!
All’alba vincerò!
Vincerò!
Vincerò!
¡Que nadie duerma!
¡Que nadie duerma!
¡Tú también, princesa,
en tu fría estancia
miras las estrellas que tiemblan
de amor y de esperanza!
¡Mas mi misterio
está encerrado en mí,
mi nombre nadie sabrá!
¡No, no, sobre tu boca lo diré,
cuando resplandezca la luz!
¡Y mi beso deshará
el silencio que te hace mía!

¡Su nombre nadie sabrá…
y nosotros, ay, tendremos que morir! ¡Morir!

¡Disípate, oh noche!
¡Estrellas, ocultaos!
¡Al alba venceré!
¡Venceré!
¡Venceré!
Link

http://musica-italiana.blogspot.com/2011/02/nessundormatraduccionespanolturandotpuc.html

http://karahidden.blogspot.com/2009/02/nessun-dorma-turandot-puccini.html

Publicado en Uncategorized | Comentarios desactivados en Nessun dorma – »Turandot» (Puccini) traducion

Multi-Page PDF in GIMP

Desea exportar varias layers en gimp buscando una solución encontré este complemento, pero se tiene que segir unos pasos en caso que se desea ejecutar en algun derivado de Debian/Ubuntu.

descargar https://imagemagick.org/script/download.php

pegar esto en la carpeta de plugins .gimp-2.8/plug-ins/export_pdf_layers_as_png.py y darle permiso con permiso chmod u+x export_pdf_layers_as_png.py

#!/usr/bin/env python
#
# Author: helour
# Copyright: 2013-2015 helour
# Based on the cr33dog's script Export Layers as PNG (http://registry.gimp.org/node/18440)
# License: GPL v3+
#
# Version: 0.7
#
# GIMP plugin to export layers as a multiple pages PDF file
#
#
# Note for Windows users:
#
# You need add the ImageMagic directory (which consists the 'convert.exe' executable file)
# to the GIMP environment PATH variable into the file:
# C:\Program Files\GIMP 2\lib\gimp\2.0\environ\default.env
#
# like in the example here:
# PATH=${gimp_installation_dir}\bin;${gimp_installation_dir}\32\bin;C:\Program Files\ImageMagick-6.9.1-Q16
# PYTHONPATH=${gimp_installation_dir}\32\lib\gimp\2.0\python


import os
import gtk
from subprocess import check_call
from tempfile import mkstemp

from gimpfu import *

def mktmpfile(suffix):
        fd, filename = mkstemp(suffix=suffix)
        fptr = os.fdopen(fd)
        return filename

def get_layers_to_export(layers, only_visible, gimp_version):
        result = []
        for layer in layers:
                if gimp_version >= 2.8 and pdb.gimp_item_is_group(layer):
                        result += get_layers_to_export(layer.children, only_visible, gimp_version)
                else:
                        if only_visible:
                                if layer.visible:
                                        result.append(layer)
                        else:
                                result.append(layer)
        return result

def combine_images_into_pdf(img_files, pdf_file):
        try:    # Run on shell because of conflict with windows system command 'convert.exe'
                check_call(['convert'] + img_files + [pdf_file], shell = True if os.name == 'nt' else False)
        except Exception as e:
                pdb.gimp_message("Error while executing 'convert' command:\n" +
                                 str(e) +
                                 "\n\nHave you installed the ImageMagic package\nand/or\nset the GIMP environment PATH variable?")

def export_layers(image, only_visible, quality):
        if not image.filename:
                pdb.gimp_message("Please save your file first!")
                return

        chooser = gtk.FileChooserDialog(title = None, action = gtk.FILE_CHOOSER_ACTION_SAVE,
                                        buttons = (gtk.STOCK_CANCEL, gtk.RESPONSE_CANCEL, gtk.STOCK_OPEN, gtk.RESPONSE_OK))
        chooser.set_current_folder(os.path.dirname(image.filename))
        chooser.set_current_name(os.path.splitext(image.filename)[0] + '.pdf')
        if chooser.run() != gtk.RESPONSE_OK:
                return
        filename = chooser.get_filename()
        chooser.destroy()

        version = gimp.version[0:2]
        gimp_version = float(version[0]) + float(version[1]) / 10.0

        layers_to_export = get_layers_to_export(image.layers, only_visible, gimp_version)
        img_files = []
        try:
                for layer in layers_to_export:
                        ext = '.jpg' if quality < 100 else '.png'
                        fullpath = mktmpfile(ext)
                        img_files.append(fullpath)
                        pic_filename = os.path.basename(fullpath)
                        if quality < 100:
                            pdb.file_jpeg_save(image, layer, fullpath, pic_filename, quality / 100.0, 0, 1, 0, "", 0, 1, 0, 2)
                        else:
                            pdb.file_png_save(image, layer, fullpath, pic_filename, 0, 9, 1, 1, 1, 1, 1)
                combine_images_into_pdf(img_files, filename)
        finally:
                for img in img_files:
                        try:
                                os.remove(img)
                        except:
                                pass

register(
        "export-layers-to-pdf", #name
        "Export layers to a multiple pages PDF file", #description
        "Export all layers to a single multiple pages PDF file", #help
        "helour", #author
        "helour", #copyright
        "2015", #year
        "Export layers to PDF", #menu label
        "*", # image format
        [       #input args. Format (type, name, description, default [, extra])
                (PF_IMAGE, "image", "Image", None),
                (PF_BOOL, "only_visible", "Only Visible Layers?", True),
                (PF_SLIDER, "quality", "Image quality", 100, (10, 100, 1)),
        ],
        [], #results. Format (type, name, description)
        export_layers, #callback
        menu=("<Image>/File/Export/"),
)

main()

Ahora renombar el ejecutable imagemagic al convert

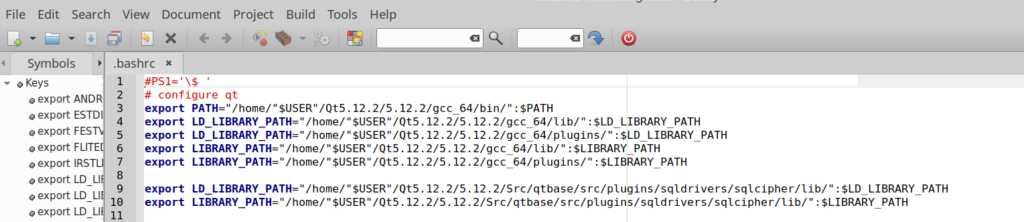
Editar el con gedit, nano,geanEy ~/.bashrc

pegar esto al final: export PATH=»/home/gman/imagemagic/»:$PATH

Ejecutar source ~/.bashrc para actualizar path

Nota: ejecutar gimp en caso de no funcionar reiniciar ubuntu o debian

Publicado en Uncategorized | Comentarios desactivados en Multi-Page PDF in GIMP

Compile driver mysql to qt5 for Gnu/Linux ubuntu, debian and derivatives

Step 1: download qt5 y configure environment variables

Online installer: https://www.qt.io/download-qt-installer?hsCtaTracking=9f6a2170-a938-42df-a8e2-a9f0b1d6cdce%7C6cb0de4f-9bb5-4778-ab02-bfb62735f3e5

Offline installer: https://www.qt.io/offline-installers

Archive src, modules, offline: https://download.qt.io/archive/

Install the version of qt5 you want once installed, put this the .bashrc

export PATH="/home/"$USER"/Qt5.12.2/5.12.2/gcc_64/bin/":$PATH export LD_LIBRARY_PATH="/home/"$USER"/Qt5.12.2/5.12.2/gcc_64/lib/":$LD_LIBRARY_PATH export LD_LIBRARY_PATH="/home/"$USER"/Qt5.12.2/5.12.2/gcc_64/plugins/":$LD_LIBRARY_PATH export LIBRARY_PATH="/home/"$USER"/Qt5.12.2/5.12.2/gcc_64/lib/":$LIBRARY_PATH export LIBRARY_PATH="/home/"$USER"/Qt5.12.2/5.12.2/gcc_64/plugins/":$LIBRARY_PATH

It should look like this

select the version of qt you want to compile, in this case I am using version 5.12

now you can restart or simply in terminal place source .bashrc

Step 2: Download mysql-dev

apt-get install libmysqlclient20 libmysqlclient-dev libssl-dev

note: this can change according to the distribution you use libmysqlclient20 since this version is 20 you just have to search with apt-cache

Step 3: compile driver mysql QT5

Open terminal and execute commads

 mysql="/home/"$USER"/Qt5.12.2/5.12.2/Src/qtbase/src/plugins/sqldrivers/mysql"
 cd $mysql
 sed -i -e "s|QMAKE_USE += mysql|# QMAKE_USE += mysql|" mysql.pro
 ls

note: some versions of qt5 work with qmake qmake «INCLUDEPATH+=/usr/include/mysql» «LIBS+=-L/usr/lib/x86_64-linux-gnu/libmysqlclient.a -lmysqlclient_r» mysql.pro, you can see the discussion at https://stackoverflow.com/questions/4486584/what-is-difference-between-libmysqlclient-a-and-libmysqlclient-r-a

  • run qmake: qmake «INCLUDEPATH+=/usr/include/mysql» «LIBS+=-L/usr/lib/x86_64-linux-gnu/libmysqlclient.so -lmysqlclient» mysql.pro
  • Enter:
  • make
  • run and enter: make install
  • cd ../../../../../../gcc_64/plugins/sqldrivers/
  • ls

show driver mysql.

Publicado en Uncategorized | Comentarios desactivados en Compile driver mysql to qt5 for Gnu/Linux ubuntu, debian and derivatives

Predefinir Relación de aspecto(aspect) SMplayer

Para que los videos se puede tener la relacion de 16:9 debemos de realizar esto.

Opciones -> Preferencias -> Avanzado -> MPlayer/mpv -> Opciones

debemos de pegar esto:

-aspect 16:9

con eso deberíamos poder tener predefinido la Relación de aspecto en smplayer.

Publicado en DEBIAN/GNU, DISTRIBUCIONES GNU/LINUX, TUTORIALES GNU/LINUX | Comentarios desactivados en Predefinir Relación de aspecto(aspect) SMplayer

Intalar o instalacion lynis ubuntu 18 y debian 9

pasos para intalar

ubuntu 18 lynis:
1. sudo apt-key adv –keyserver keyserver.ubuntu.com –recv-keys C80E383C3DE9F082E01391A0366C67DE91CA5D5F
2. sudo wget -O – https://packages.cisofy.com/keys/cisofy-software-public.key | sudo apt-key add –
3. sudo apt install apt-transport-https
4. sudo echo ‘Acquire::Languages «none»;’ | sudo tee /etc/apt/apt.conf.d/99disable-translations
5. sudo echo «deb https://packages.cisofy.com/community/lynis/deb/ stable main» | sudo tee /etc/apt/sources.list.d/cisofy-lynis.list
6. sudo apt-get update
7. sudo apt-get install lynis
8. sudo lynis show version
9. sudo lynis audit system

debian 9:

1. apt-key adv –keyserver keyserver.ubuntu.com –recv-keys C80E383C3DE9F082E01391A0366C67DE91CA5D5F
2. wget -O – https://packages.cisofy.com/keys/cisofy-software-public.key | sudo apt-key add –
3. apt install apt-transport-https
4. echo ‘Acquire::Languages «none»;’ | sudo tee /etc/apt/apt.conf.d/99disable-translations
5. echo «deb https://packages.cisofy.com/community/lynis/deb/ stable main» | sudo tee /etc/apt/sources.list.d/cisofy-lynis.list
6. apt-get update
7. apt-get install lynis
8. lynis show version
9. lynis audit system

Publicado en DISTRIBUCIONES GNU/LINUX | Comentarios desactivados en Intalar o instalacion lynis ubuntu 18 y debian 9

Install lynis ubuntu 18 and debian 9

steps to install:

ubuntu 18 lynis:
1. sudo apt-key adv –keyserver keyserver.ubuntu.com –recv-keys C80E383C3DE9F082E01391A0366C67DE91CA5D5F
2. sudo wget -O – https://packages.cisofy.com/keys/cisofy-software-public.key | sudo apt-key add –
3. sudo apt install apt-transport-https
4. sudo echo ‘Acquire::Languages «none»;’ | sudo tee /etc/apt/apt.conf.d/99disable-translations
5. sudo echo «deb https://packages.cisofy.com/community/lynis/deb/ stable main» | sudo tee /etc/apt/sources.list.d/cisofy-lynis.list
6. sudo apt-get update
7. sudo apt-get install lynis
8. sudo lynis show version
9. sudo lynis audit system

debian 9:

1. apt-key adv –keyserver keyserver.ubuntu.com –recv-keys C80E383C3DE9F082E01391A0366C67DE91CA5D5F
2. wget -O – https://packages.cisofy.com/keys/cisofy-software-public.key | sudo apt-key add –
3. apt install apt-transport-https
4. echo ‘Acquire::Languages «none»;’ | sudo tee /etc/apt/apt.conf.d/99disable-translations
5. echo «deb https://packages.cisofy.com/community/lynis/deb/ stable main» | sudo tee /etc/apt/sources.list.d/cisofy-lynis.list
6. apt-get update
7. apt-get install lynis
8. lynis show version
9. lynis audit system

Publicado en DISTRIBUCIONES GNU/LINUX | Comentarios desactivados en Install lynis ubuntu 18 and debian 9